Installing Cabinet Hardware Right Small Details Big Impact
Installing cabinet hardware may seem like a minor step in a kitchen or bathroom update, but it has a surprisingly powerful effect on the final result. Handles and knobs are touched every day, seen from every angle, and often set the tone for the entire space. When cabinet hardware is installed correctly, cabinets feel balanced, intentional, and professional. When it is installed poorly, even high quality cabinets can look unfinished or awkward.
Also Read: Thoughtful Remodeling That Boosts Home Comfort and Value
Whether the project is a full kitchen remodel or a DIY cabinet refresh, understanding proper hardware placement techniques is essential for achieving a professional-looking result.
Why Cabinet Hardware Installation Matters
Cabinet hardware is both functional and decorative. It affects how easily doors and drawers open, how long cabinets last, and how the space feels visually. Even small placement errors can stand out once all the hardware is installed.
Correct installation improves daily use. Handles placed at the right height and distance reduce strain on hands and wrists. Proper alignment helps doors close smoothly and prevents unnecessary wear on hinges. From a design perspective, evenly installed hardware creates rhythm and balance across cabinetry, making the room feel calm and well designed.
Why Hardware Installation Matters More Than People Expect
Cabinet hardware is one of the most frequently touched elements in a kitchen. Poor alignment, uneven spacing, or inconsistent heights become noticeable very quickly during daily use.
Common issues caused by improper installation include:
- Crooked handles that break visual symmetry
- Inconsistent spacing between doors and drawers
- Premature loosening due to poor screw alignment
Because hardware is installed after cabinets are already in place, mistakes are harder to hide and often require re-drilling or patching.
Planning Before You Drill
The most important step in cabinet hardware installation happens before any drilling begins. Measuring once is rarely enough — consistent referencing is what ensures uniformity across the entire kitchen.
Key planning considerations include:
- Choosing a consistent reference point for all doors
- Aligning drawer pulls at the same vertical height
- Accounting for door stile width and drawer face size
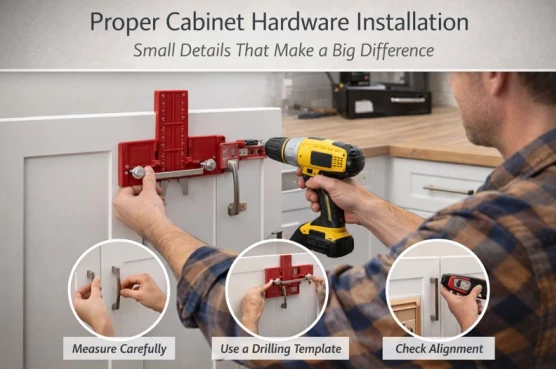
Many installers use simple templates or jigs to avoid slight variations that can compound across multiple cabinets.
DIY-Friendly Techniques That Improve Accuracy
For homeowners installing hardware themselves, a few practical techniques can dramatically improve results:
- Use a drilling jig or template to maintain consistent hole spacing
- Dry-fit hardware before final tightening
- Install all hardware in one session to avoid small measurement shifts
- Check alignment visually and with a level, not just measurements
These small habits often separate amateur-looking installs from professional ones.
A detailed walkthrough of these techniques, including spacing tips and common mistakes, is outlined in this guide on DIY cabinet hardware installation tips and tricks for a professional finish:
Common Mistakes to Avoid
Even careful installers run into a few recurring problems:
- Rushing through measurements
- Mixing handle styles or sizes unintentionally
- Over-tightening screws, which can damage cabinet fronts
- Skipping pilot holes on hardwood doors
Avoiding these mistakes saves time and preserves the cabinet finish.
Final Thoughts
Installing cabinet hardware may seem like a small task, but it plays a major role in how polished a kitchen ultimately feels. With proper planning, consistent measuring, and attention to detail, DIY installers can achieve results that rival professional installations.
Taking the time to do it right the first time is always easier than fixing mistakes later.