How to Build a Home Golf Simulator
Building a golf simulator at home can sound like a complicated project, but it becomes much easier when you break it into a few practical decisions. The goal is not to buy every piece of equipment available. It is to create a setup that fits your room, your playing habits, and your budget.
A home simulator can be anything from a simple net and launch monitor in a garage to a dedicated room with an impact screen, projector, and full enclosure. Before spending money on equipment, it is worth understanding what each part does and how the components need to work together.
Start by Measuring the Room
The room should be the first thing you consider, not the launch monitor. Ceiling height is particularly important because a simulator needs enough overhead clearance for a full golf swing.
Measure the ceiling, width, and depth of the available space. Do this before choosing equipment. A launch monitor can be replaced if it does not suit your setup, but changing the physical limitations of a room is much harder.
You should also think about the position of the golfer, the ball, and the screen or net. Leave enough room behind and around the hitting position for comfortable movement and safe swings.
Decide What You Want the Simulator to Do
Not every simulator needs to be a complete indoor golf experience. Your intended use should determine how much equipment you actually need. If your main goal is practicing your swing and checking ball data, a launch monitor, hitting mat, and net may be enough. If you want to play virtual courses and make the setup feel more like an indoor golf facility, an impact screen and display become more useful.
Think about how often you will use it as well. Someone who practices several times a week can get much more value from a dedicated setup than someone who expects to use it only occasionally.
Choose the Launch Monitor Carefully
The launch monitor is arguably the most important piece of the system because it reads information from your shots and determines what data or simulator functions are available.
Different launch monitors use different technologies. Some use radar and are positioned behind the golfer, while camera-based systems may sit beside or around the hitting area. Their placement requirements can affect how much room you need.
Software compatibility should also be checked before buying. A launch monitor may support certain simulator platforms but not others, so it is better to decide which software you want and then confirm that the monitor works with it.
This is one area where researching first can prevent an expensive mistake later.
Choose Between a Net and an Impact Screen
The hitting surface is another major decision.
A golf net is usually the simpler option. It requires less equipment, can work in a smaller space, and is relatively easy to move or store. The main drawback is that it does not provide a large projected image by itself.
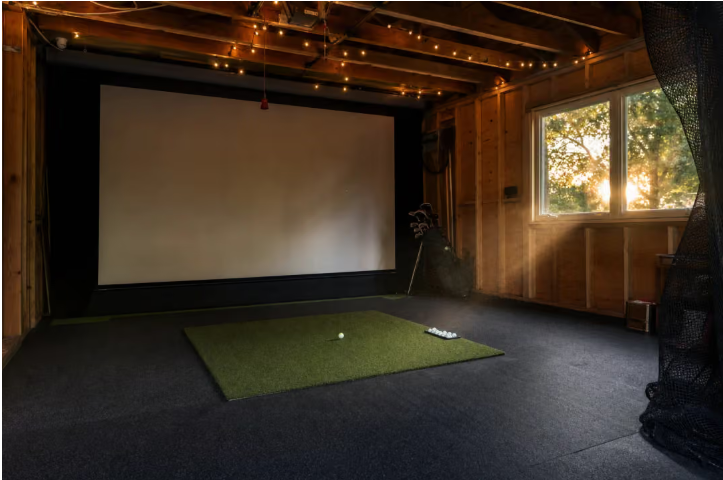
An impact screen serves two purposes. It stops the golf ball while also providing a surface for projected images. This can make the simulator much more immersive, but it normally requires a frame or enclosure and more planning.
If you are unsure whether you will use a simulator regularly, starting with a net can be a sensible approach. You can always move toward a screen-based setup later.
Think About the Display
If you choose an impact screen, you will need to decide how to display the simulator software.
A projector is the traditional choice because it can produce a large image across the screen. However, projector placement, throw distance, brightness, focus, and room lighting all need to be considered. A large television is another possibility. It is generally easier to install and remains visible in a brighter room. The trade-off is that the image is limited to the size of the television rather than covering a large impact screen.
There is no universal winner. A dedicated simulator room with controlled lighting may suit a projector, while a shared room can be easier to manage with a TV.
Don’t Forget the Software
The software connects the equipment to the actual simulator experience. Depending on the platform and launch monitor, you may be able to practice on a virtual driving range, play simulated courses, analyze shots, or compete with other players.
Before choosing software, check its current hardware requirements. Some programs require a reasonably capable PC, particularly when rendering detailed courses.
Also check whether the software requires a subscription. A system can appear affordable at first but become more expensive over time if the software involves recurring fees.
Choose the Right Mat
The golf mat is easy to underestimate. You may spend most of your attention on the launch monitor and display, but the mat is the surface you will stand and swing from during every session.
A good mat should provide a stable stance and enough cushioning for repeated practice. It should also have enough space for the hitting position you intend to use. Avoid choosing a very thin mat simply to save money. Repeatedly hitting from an uncomfortable surface can make practice less enjoyable and may place unnecessary strain on your body.
The exact requirements also depend on whether you are building the simulator for one golfer or several people.
Decide Whether You Need an Enclosure
An enclosure is mainly relevant when using an impact screen. It can include side and overhead netting to help contain shots that do not travel directly toward the screen.
This can be particularly useful in a shared room, garage, or other space where an unexpected shot could damage nearby objects.
An open frame can be a simpler alternative, but it provides less protection around the sides. Before choosing either option, check the complete footprint rather than measuring only the area where you will swing.
Put the Components Together in the Right Order
The order in which you make decisions can save both money and frustration.
First, measure the room. Next, choose the launch monitor and confirm which simulator software it supports. After that, decide whether you want a net or impact screen. If you choose an impact screen, check the available space before buying the enclosure or frame. Then decide whether a projector or TV makes more sense.
The mat can be chosen once you know the final layout and hitting position.
This order matters because some components depend on others. For example, buying a projector before deciding on the screen size and room layout can leave you with installation problems later.
Set a Realistic Budget
A home simulator budget should include more than the launch monitor.
Consider the cost of the hitting surface, mat, display, computer or other device, software, cables, mounting equipment, and enclosure if you need one. Small accessories can add up, particularly when building a more permanent setup. If the budget is limited, it is usually better to build a simple system that works well than to spend most of the money on one expensive component and compromise on everything else.
A basic setup can also provide a useful way to test whether you genuinely enjoy practicing at home before investing in a more elaborate room.
Common Mistakes to Avoid
One of the biggest mistakes is buying equipment before checking the room. Another is assuming that all launch monitors work with all simulator software. People also tend to underestimate the importance of the mat and forget about computer requirements. Projector placement is another common problem. A projector needs to work with the chosen screen size and the available throw distance.
Finally, think about storage and maintenance. If the equipment needs to be packed away after every session, make sure that process is realistic for your lifestyle. A simulator that is difficult to set up may end up being used less than expected.
How Long Does a Home Simulator Take to Build?
The answer depends on the design.
A simple net-and-mat setup can often be assembled in an afternoon once the equipment is available. A larger enclosure with an impact screen and projector requires considerably more work. A permanent setup may involve assembling a frame, mounting the projector, arranging cables, setting up the computer, and calibrating the display and launch monitor.
You do not necessarily need professional installation for a typical home setup, but rushing through the process can lead to alignment and calibration problems.
Final Thoughts
Before buying equipment, it helps to have a clear idea of the available space, your preferred setup, and how you expect to use the simulator. A practical guide can also help you organize these decisions and avoid overlooking important details when putting everything together. For a step-by-step reference, How to Build a Home Golf Simulator offers additional guidance on planning and assembling a home setup.
The best home golf simulator is not necessarily the biggest or most expensive one. It is the setup that fits your available space and gives you the type of practice or entertainment you actually want.
Start with the room, choose the launch monitor carefully, confirm software compatibility, and then build the rest of the system around those decisions. If you are new to indoor golf, beginning with a simpler setup can also reduce the risk of spending heavily before knowing how often you will use it.
With some careful planning, a spare room, garage, or suitable indoor area can become a practical place to practice your swing without making the project unnecessarily complicated.